Correspondence is available to a Division staff in the form of a Duty. In iRecord, Duty refers to a specific task that will be performed by assigned users. Similarly, this feature is only available to those users (Division staff) that have been assigned to execute and manage correspondence.
The purpose of the feature is for recording when personalized communication has been mailed out regarding a group of participants. The tool is similar to the Mail Merge feature in Microsoft Word, utilizing the template document for recording the correspondence in each participant’s document section.
In iRecord, the user uploads the template document and the mail merge list document. The template document contains the personalized message that needs to be saved as a document for each participant from the mail merge list document.
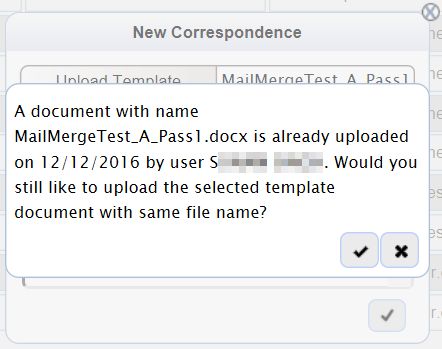
A submitted correspondence may also be cancelled or taken back from the respective participant pages by using the Roll Back option. In addition to this, iRecord recognizes a document with an identical name upon attempting to upload and notifies the user that the same document may have already been submitted previously.
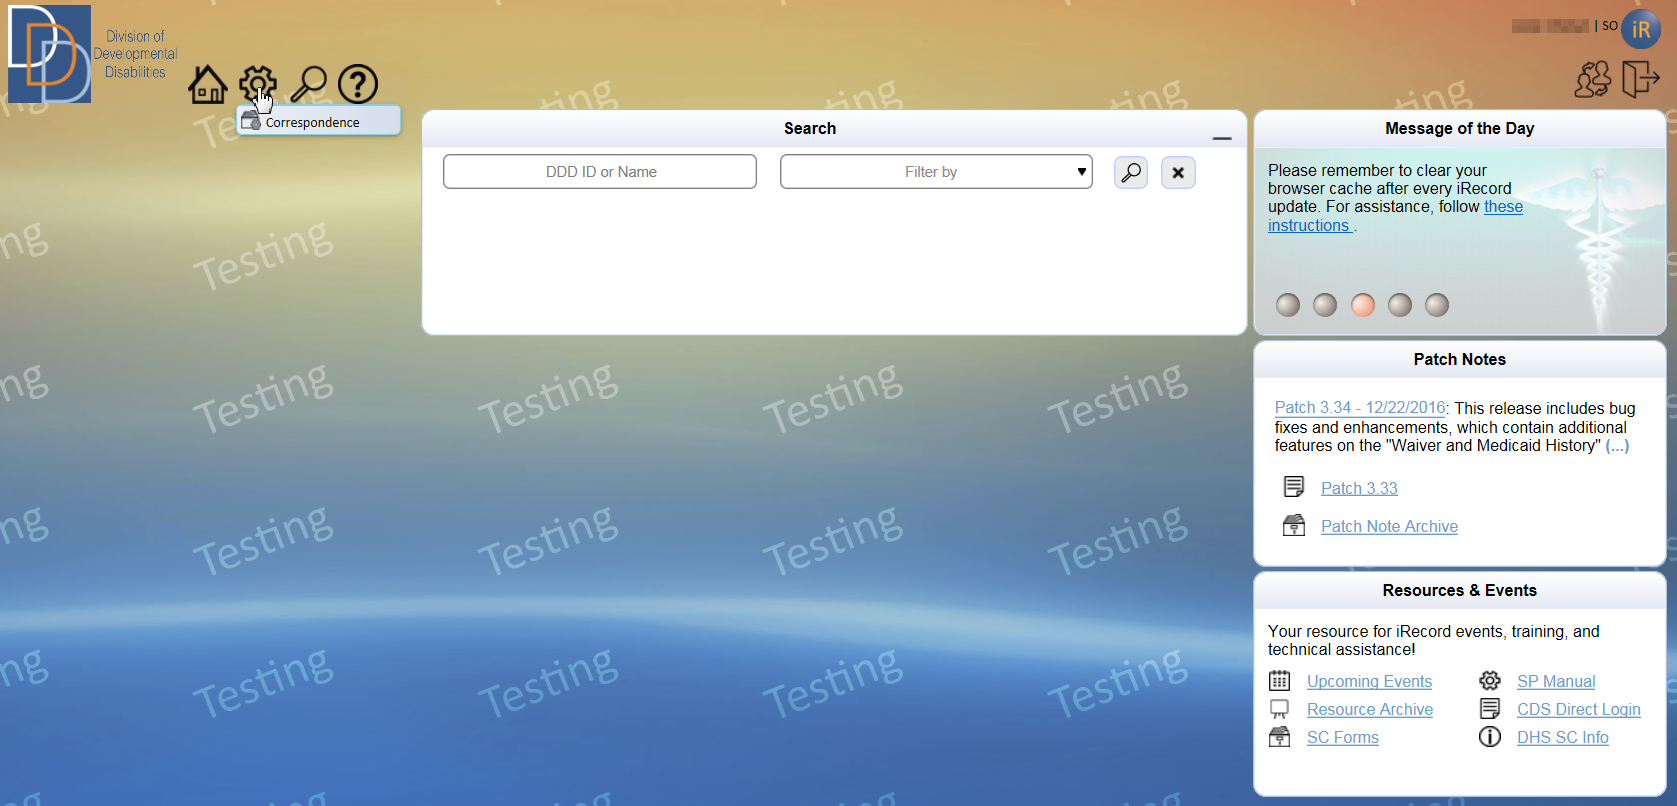
For an assigned user, the Correspondence
screen is accessed from the Management
option(s) on the Menu
Bar. The figure below shows the Correspondence
option available on ![]() (Management) for the SO (State
Only) role.
(Management) for the SO (State
Only) role.
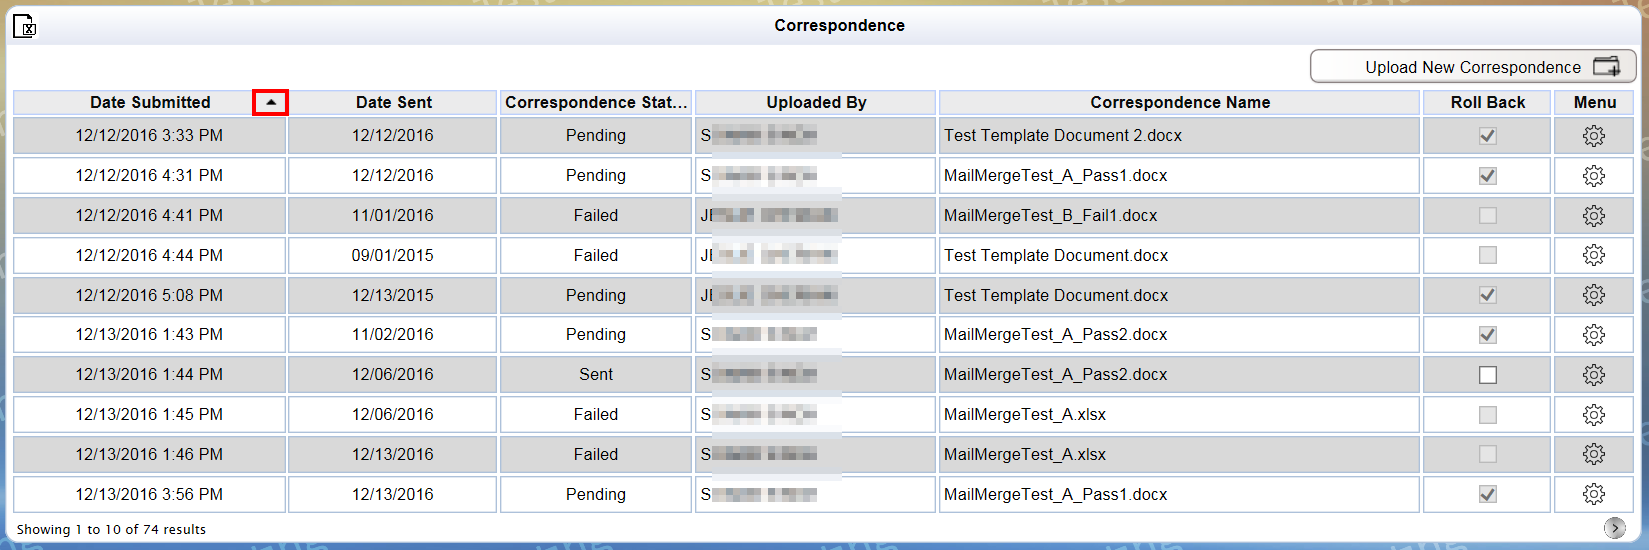
● The correspondence screen appears in a grid layout, as shown below.

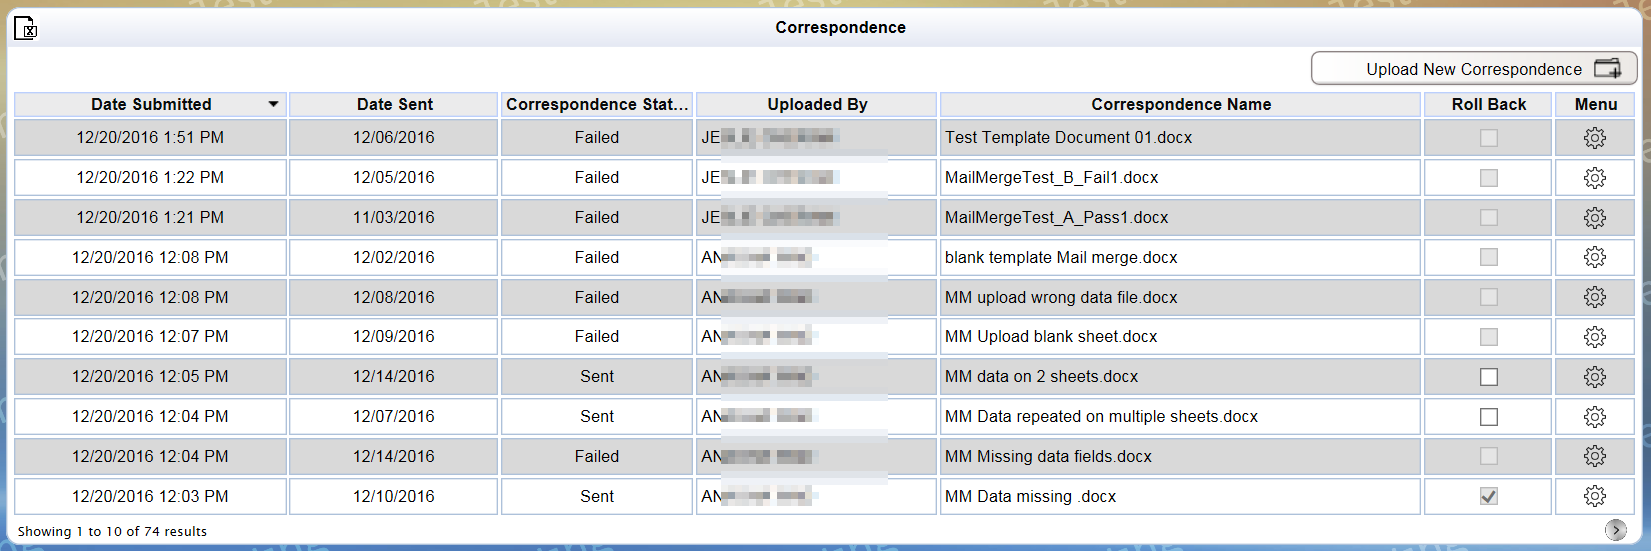
● The following table provides a brief description of the grid columns.
Column |
Description |
Date Submitted |
View the date and time of submission for the correspondence. |
Date Sent |
View the date that the correspondence was actually sent to the participant(s). |
Correspondence Status |
View the current status of the correspondence. The options are: • Sent – The document was successfully uploaded to the respective participants’ records • Pending – The user has submitted the correspondence and the action to send the document to the respective participants’ records has not yet been performed • Failed – The submitted correspondence was unsuccessful and no documents have been attached to any participants’ records. |
Uploaded By |
Displays the user that submitted the correspondence on iRecord. |
Correspondence Name |
The name of the document that was provided for correspondence shows here. |
Roll Back |
The roll back column displays a check box and it is selection of this control that initiates roll back of correspondence. The user does not have the option of Roll Back for a Failed status. |
Menu |
There are additional options available for each correspondence. Click • View Template Document • View Mail Merge List • View Notes |
● By default,
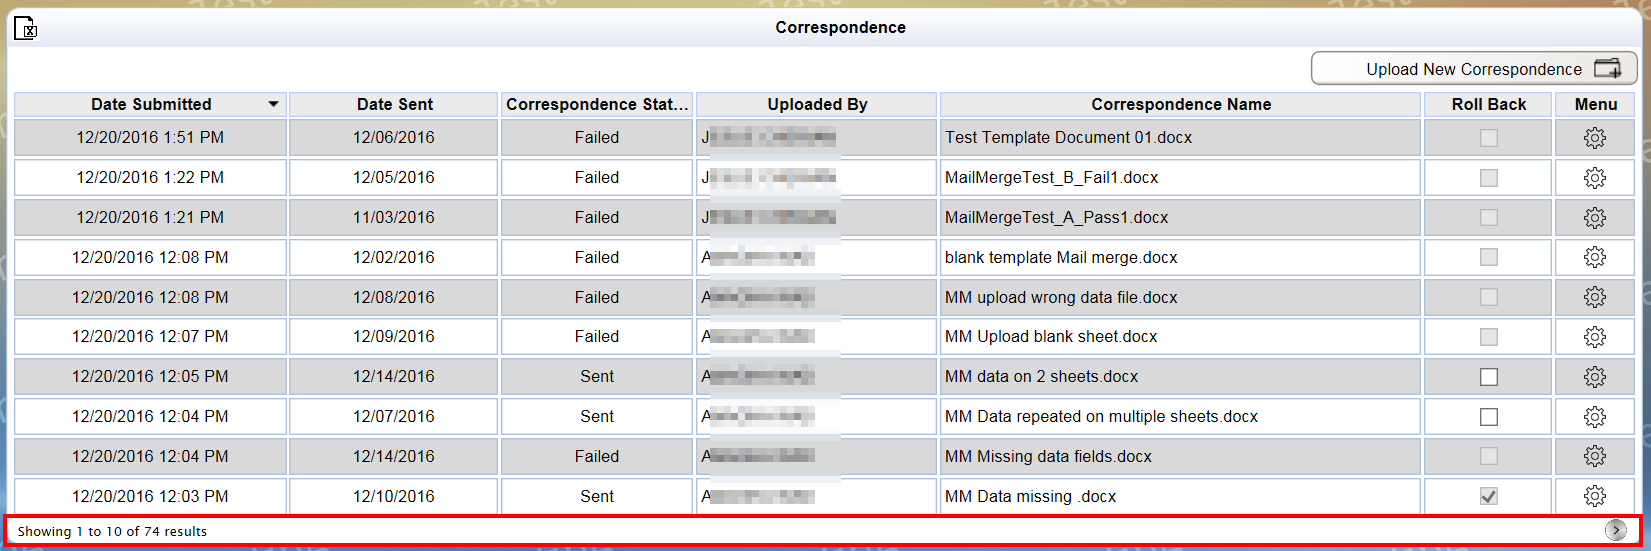
the grid displays a maximum of 10 entries. At the bottom of the grid,
view the total number of entries and the current set of results.
Click  or
or  to view the
next or previous set, respectively. The icons appear for an applicable
set of results. For example, the screen capture displays the first set
of results and shows only the next icon.
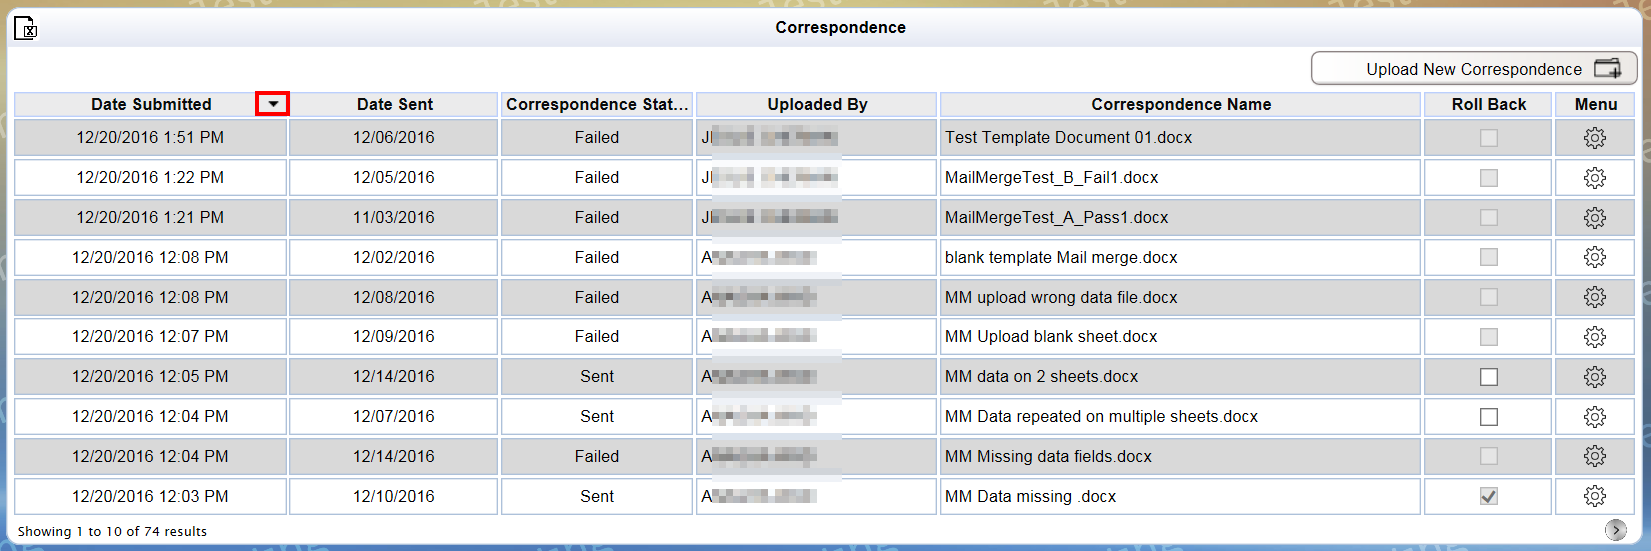
● Sort the
grid from any column in the ascending or descending order. By default,
the grid is sorted in the descending order of the Date
Submitted header.
Click header to sort the grid from any selected column. An additional click
on the same header will reverse the order. The column displays ![]() and
and
![]() for descending and ascending order sort, respectively.
for descending and ascending order sort, respectively.
● Export
the grid to an Excel file using the  icon.
icon.

● Hover over an item that shows an ellipsis to view a tooltip that displays the full details.

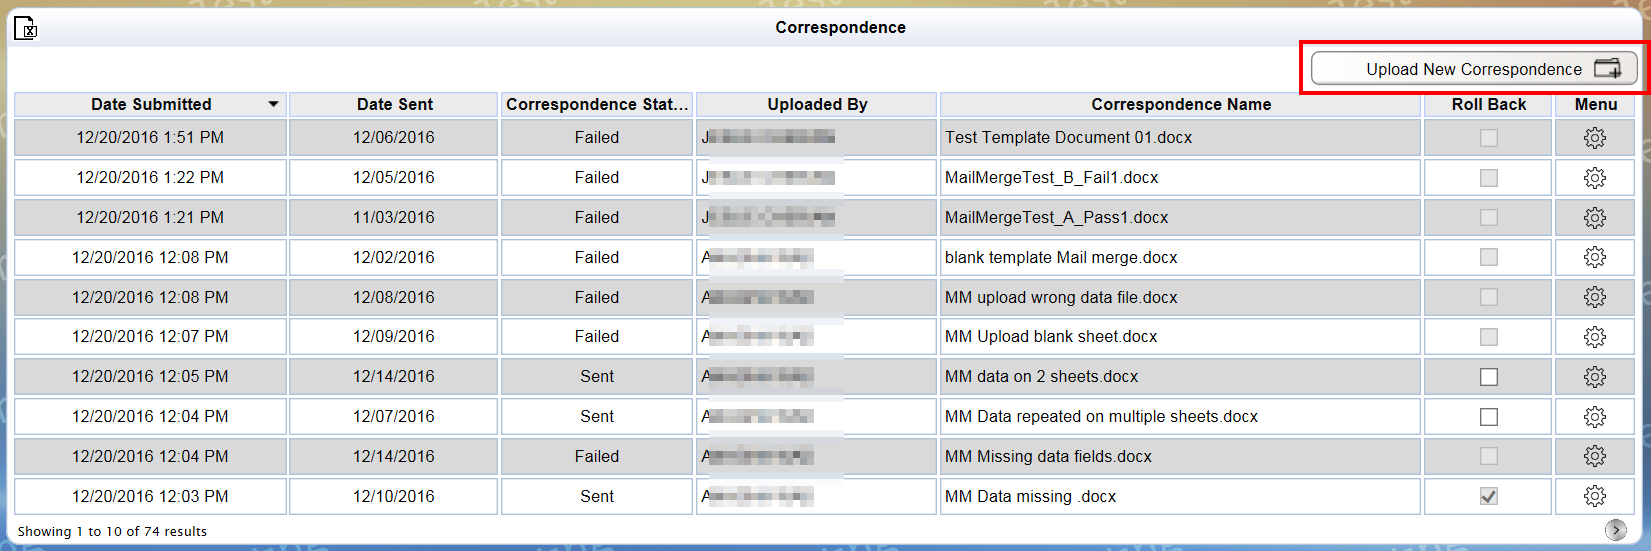
1. On Correspondence, click the Upload New Correspondence button.
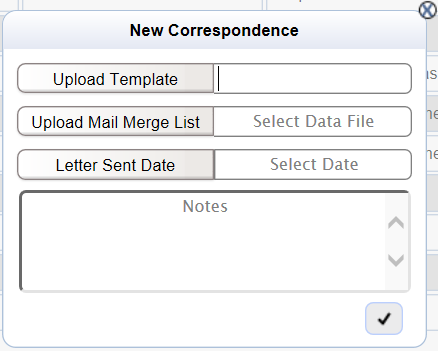
2. The New Correspondence pop-up appears,
as shown.
Select or enter the respective fields. For more information, refer to the
following table.
Field |
Description |
Upload Template |
Select the template of the letter for your correspondence. Click the field to view the Choose File to Upload dialog box. Locate and select the file and then click the Open button. The file name appears within the box of this field. The document must have one of the following file extensions: • DOC • DOCX
When iRecord does not permit a file to be uploaded, it displays an error message (while saving) with any of the following conditions: • Incompatible file extension (see aforementioned extensions) • File size exceeds 4 MB • File name exceeds 150 characters • Special characters in the file name The permitted characters are period (.), hyphen (-) and underscore(_) |
Upload Mail Merge List |
Select the file that contains the list of participants and other information for the correspondence. Click the field to view the Choose File to Upload dialog box. Locate and select the file and then click the Open button. The file name appears within the box of this field. The document must have one of the following file extensions: • XLS • XLSX
When iRecord does not permit a file to be uploaded, it displays an error message (while saving) with any of the following conditions: • Incompatible file extension (see aforementioned extensions) • File size exceeds 4 MB • Special characters in the file name • The permitted characters are period (.), hyphen (-) and underscore(_) |
Letter Sent Date |
Enter the date that the correspondence was
sent to the participants.
Select the month and year from the dropdown lists on the top section. Click and select the date. You cannot enter or select a future date. View the message, shown below, for a date
more than a year in the past. Click the close
|
Notes |
Enter notes that are relevant to the correspondence. The field has a maximum limit of 1000 characters. |
3. Click
 .
.
iRecord displays a dialog box for a document with an identical name and
requires you to confirm the selection of the template. Click  to confirm or click
  to cancel and select another
template document.
4. The New Correspondence pop-up closes. At this time, the entered correspondence appears on the top of the Correspondence grid with a Pending status. The process initiates at this time.

5. When the process is complete, the Correspondence status changes to Sent or Failed depending on success or failure, respectively. In order to view the change in status, the user must refresh the Correspondence screen.
6. A Failed correspondence sends an e-mail to the user submitting the correspondence, as shown below. The content of the e-mail indicates the failure of correspondence and the reason that iRecord was unable to process it.

7. A correspondence that displays a Sent status indicates that the document has been delivered to the respective participant records. The Documents and Notes screens of each participant on the merge list display the respective line item of the correspondence, as shown below.


1. On Correspondence, locate the desired line item for roll back.
2. Select the Roll Back check box of the line item. This option is available, only if the Correspondence Status is either Pending or Sent.
Note: You do not need to roll back a correspondence in the Failed status and, also, the Roll Back check box is unavailable.
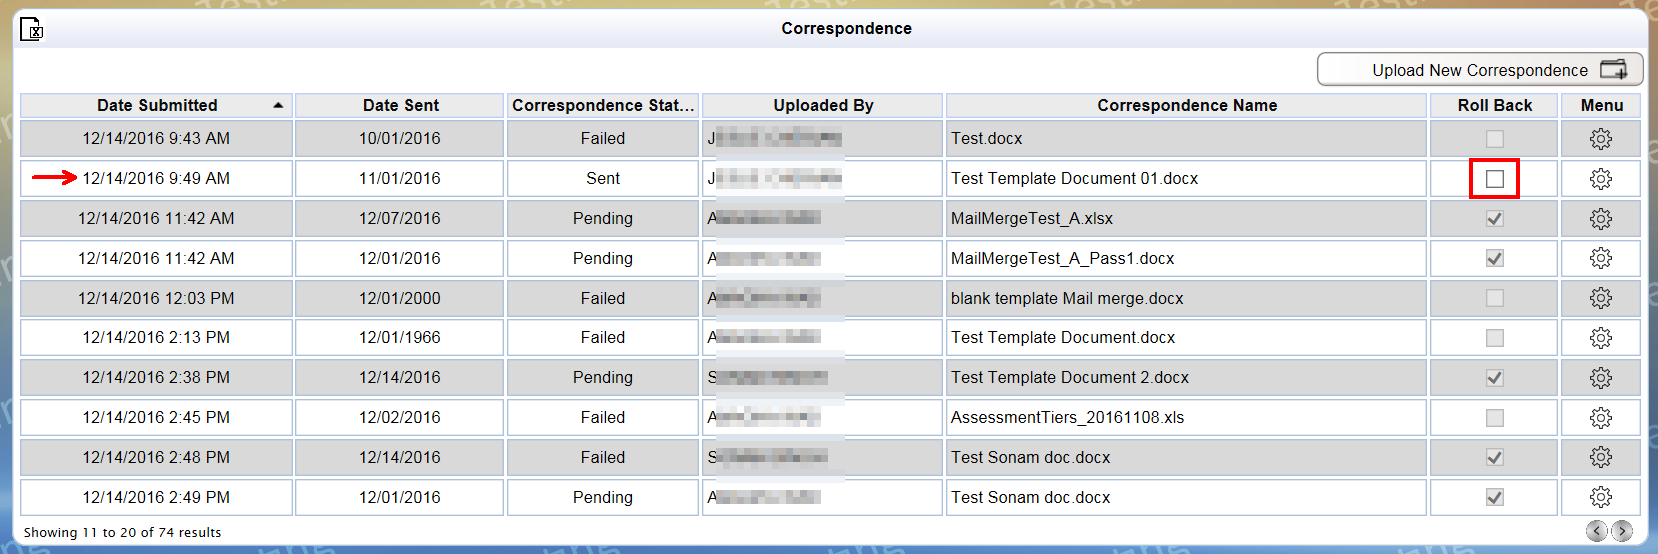
3. A Reason for Rollback pop-up appears,
as shown.
Enter notes related to the roll back of correspondence. The notes entered
must be limited to a maximum of 1000 characters.
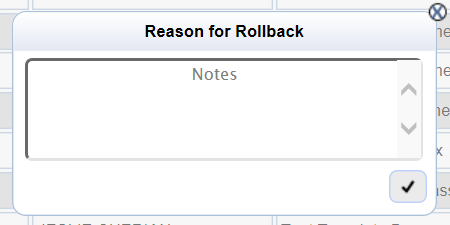
4. Click
 .
.
5. The Reason for Rollback pop up closes. The Correspondence screen appears and displays the line item with the Roll Back check box selected. At this time, the control is disabled and you cannot reverse the roll back process.
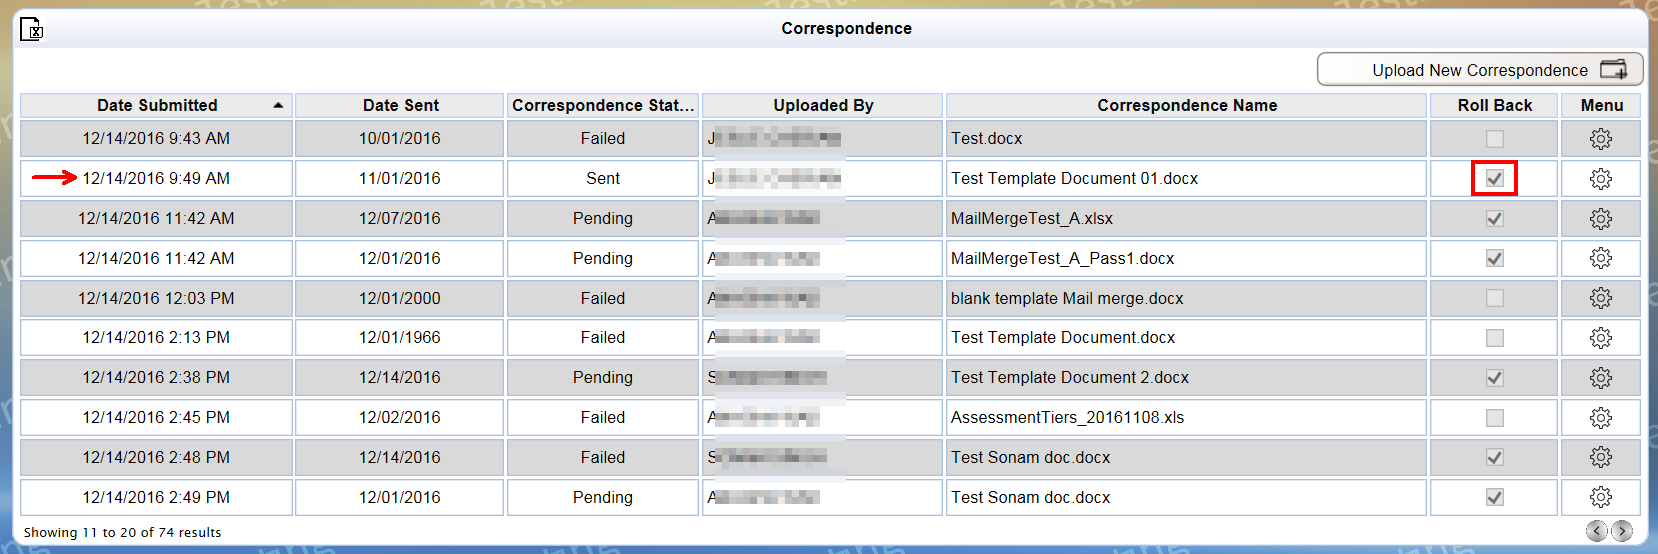
6. A roll back of an already sent correspondence deletes the line items from Documents and Notes of the respective participants. 0.
1. On Correspondence, click  .
.

2. The Save As dialog box appears, as shown below. Using the dialog box, save the file in the desired location for immediate or future reference.

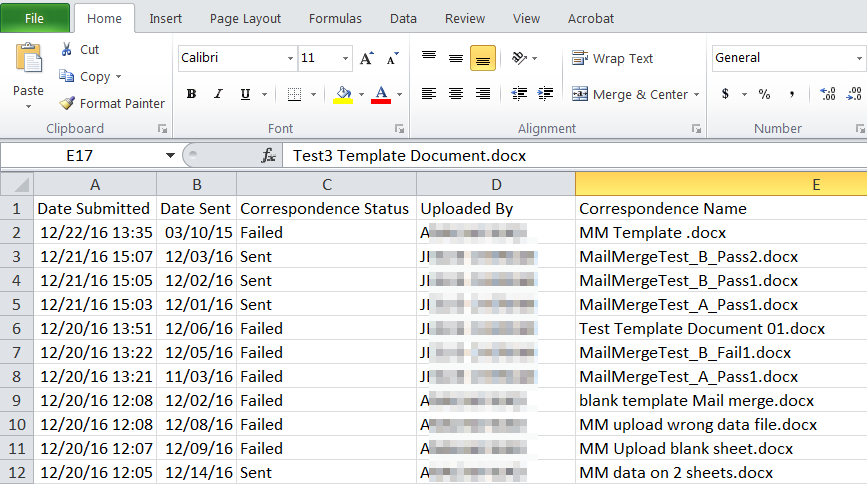
3. Open the saved file to view the details of the grid in an Excel format. The figure below displays an example of the grid in the Excel file format.
1. On Correspondence, locate the desired
line item and then click ![]() to view the menu options.
to view the menu options.

2. Click View Template Document.

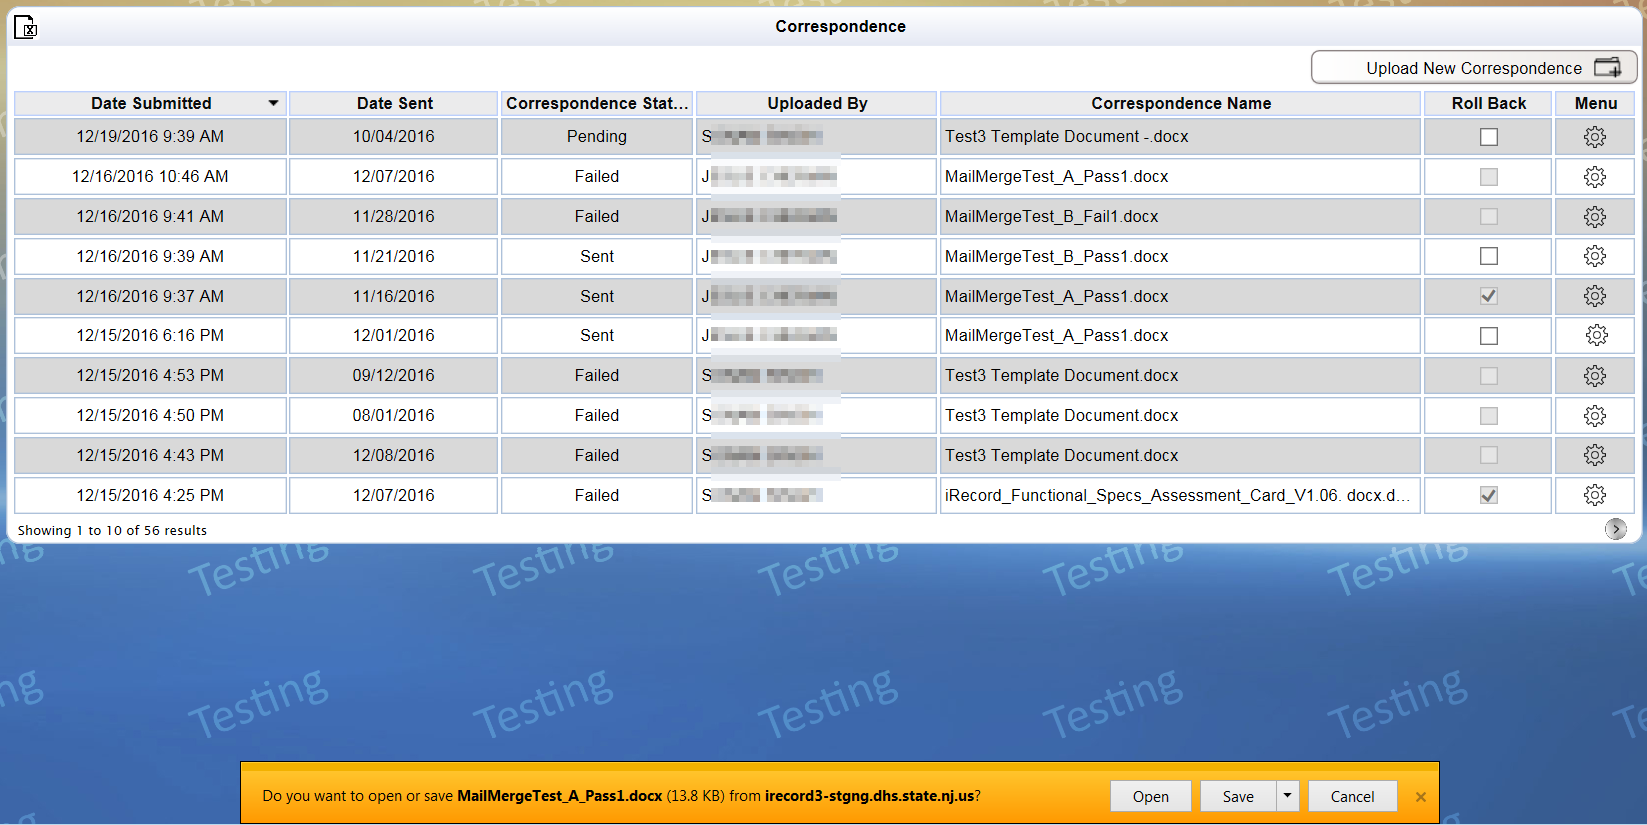
3. View a dialog box or a bar to open or save the template document. The figure below shows for the IE (Internet Explorer) browser.
Note: The controls to open or save a template document depend on your browser.
4. Click Open (IE or Firefox) or the file (Chrome) to view the template document.
1. On Correspondence, locate the desired
line item and then click ![]() to view the menu options.
to view the menu options.

2. Click View Mail Merge List.

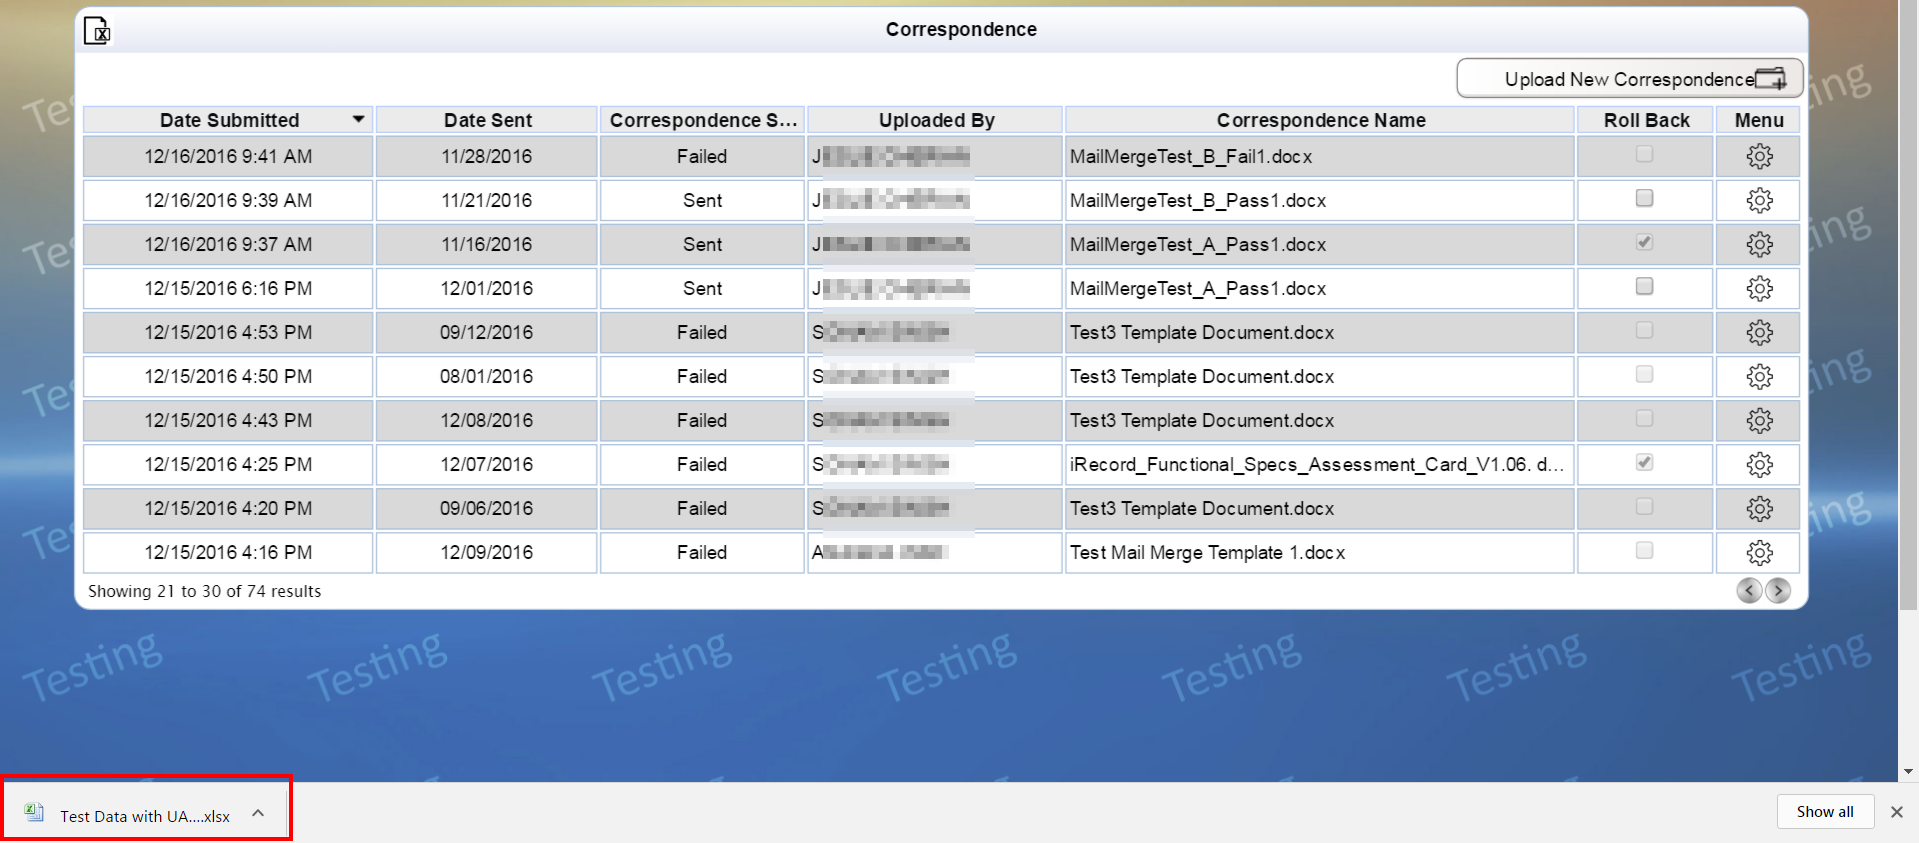
3. View a dialog box or a bar to open or save the merge list file. The figure below shows the file in the Downloads bar of the Chrome browser.
Note: The controls to open or save a merge list file depend on your browser.
4. Click Open (IE or Firefox) or the file (Chrome) to view the mail merge list file.
1. On Correspondence, locate the desired
line item and then click ![]() to view the menu options.
to view the menu options.

2. Click View Notes.

3. View the notes for the correspondence, as shown. A roll back for correspondence displays both the Initial Notes and Rollback Reason on the Notes pop-up.
